PostBox — Documentation
Lightweight contact forms for Joomla 5 & 6.
PostBox is a simple, fast form component designed for contact forms and basic enquiry forms. It replaces heavyweight form builders with a focused tool that handles AJAX submission, email notifications, spam protection, and GDPR compliance out of the box.
Requirements
- Joomla 5.0 or later (including Joomla 6)
- PHP 8.1 or later
- MySQL 5.7+ or MariaDB 10.3+
Installation
- Download the
pkg_postbox-1.0.5.zippackage file. - In your Joomla admin panel, go to System > Install > Extensions.
- Upload the package file and click Upload & Install.
- The installer will set up the PostBox component, the shortcode content plugin, and the GDPR purge task plugin.
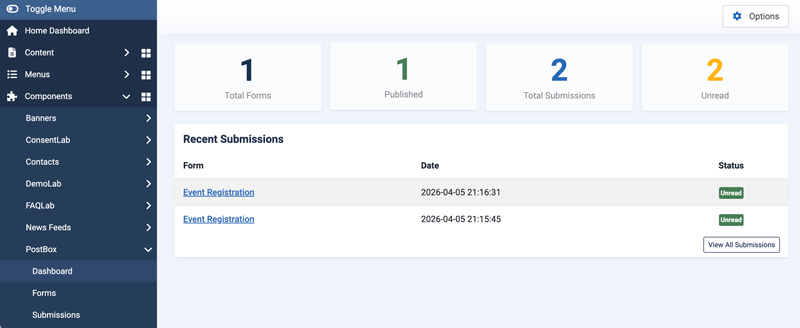
- Navigate to Components > PostBox to get started.
Getting Started
Creating Your First Form
- Go to Components > PostBox > Forms.
- Click New to create a form.
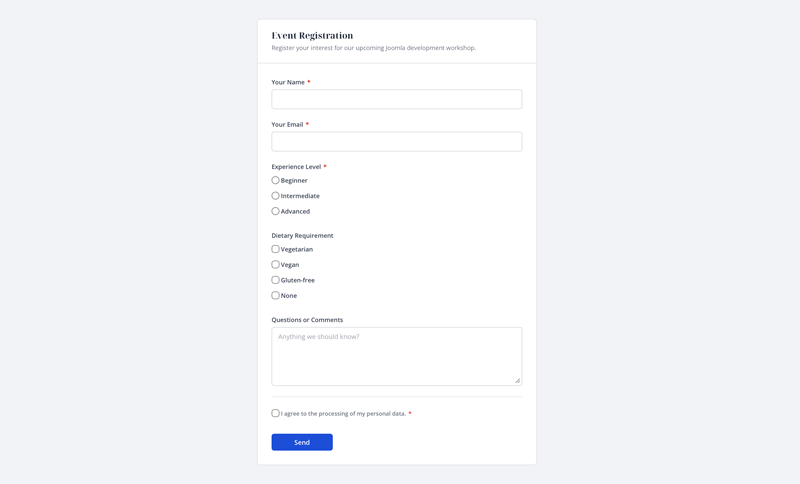
- Enter a Title (shown on the frontend) and optionally a Description (shown below the title).
- On the Email Notification tab, enter the recipient email address. Leave blank to use the Joomla system email.
- Click Save.
Adding Fields
- From the Forms list, click Manage Fields next to your form.
- Click New to add a field.
- Choose a Type (text, email, textarea, dropdown, checkbox, or radio), enter a Label, and set whether it’s Required.
- For dropdown, checkbox, and radio fields, enter one option per line in the Options field.
- Save and repeat for each field. Drag rows to reorder them.
Publishing the Form
There are two ways to display a form on your site:
Option 1: Menu Item
- Go to Menus and create a new menu item.
- Set the Menu Item Type to PostBox > Form.
- Select your form from the dropdown.
- Save and visit the page to see your form.
Option 2: Shortcode in an Article
- Make sure the PostBox — Shortcode plugin is enabled in System > Plugins.
- Create or edit an article and add the shortcode
{postbox 1}(replacing1with your form’s ID). - Add any other content around the shortcode — contact details, opening hours, a map embed, etc.
- Save and visit the article to see your form embedded in the page.
Form Settings
Each form has its own settings across several tabs in the edit view.
General
- Title — the form heading shown on the frontend.
- Alias — auto-generated URL slug.
- Description — optional text shown below the title on the frontend.
- Submit Button Text — defaults to “Send”.
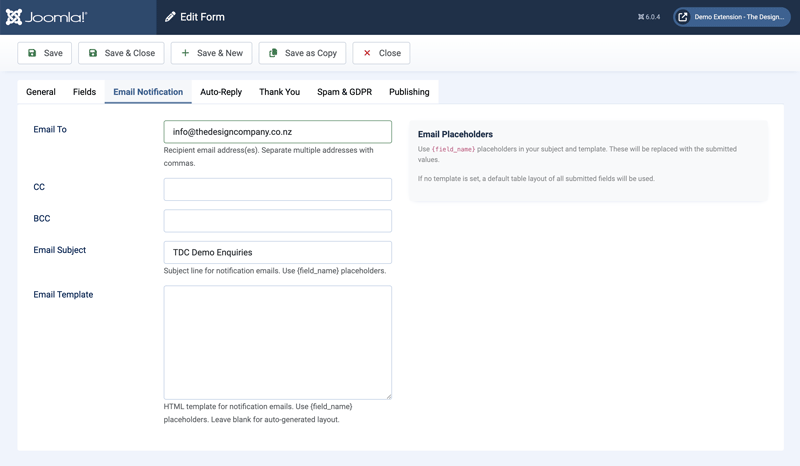
Email Notification
- Email To — recipient email address(es), comma-separated. Falls back to the Joomla system email if left blank.
- CC — carbon copy recipients.
- BCC — blind carbon copy recipients.
- Email Subject — supports
{field_name}placeholders. Defaults to “New submission from [form title]”. - Email Template — HTML body template with
{field_name}placeholders. Leave blank for an auto-generated table layout.
Auto-Reply
- Enable Auto-Reply — when enabled, sends a confirmation email to the person who submitted the form.
- Auto-Reply Subject — supports
{field_name}placeholders. - Auto-Reply Template — HTML body with placeholders. Leave blank for a generic thank-you message.
The auto-reply is sent to the first email-type field value found in the submission.
Thank You
- Thank You Type — choose between an inline message or a redirect to a URL.
- Thank You Message — shown on the form page after successful submission.
- Redirect URL — redirects the user to this URL after submission.
Spam & GDPR
- Enable Captcha — requires a captcha provider to be configured in component options.
- Require Consent — shows a consent checkbox on the form.
- Consent Text — the label for the consent checkbox.
- Data Retention (days) — auto-delete submissions older than this. Set to 0 to keep forever.
Field Types
PostBox supports six field types:
- Text — single-line text input with optional placeholder.
- Email — email input with format validation.
- Textarea — multi-line text area with optional placeholder.
- Dropdown Select — dropdown menu with custom options (one per line).
- Checkbox — single checkbox or multiple checkboxes from options list.
- Radio Buttons — radio button group from options list.
Managing Fields
- Fields are ordered by drag-and-drop in the list view.
- Click the check/cross icon in the Required column to toggle required status without opening the field.
- Each field’s Name (the HTML name attribute) is auto-generated from the label if left blank.
Submissions
All form submissions are stored in the admin panel at Components > PostBox > Submissions.
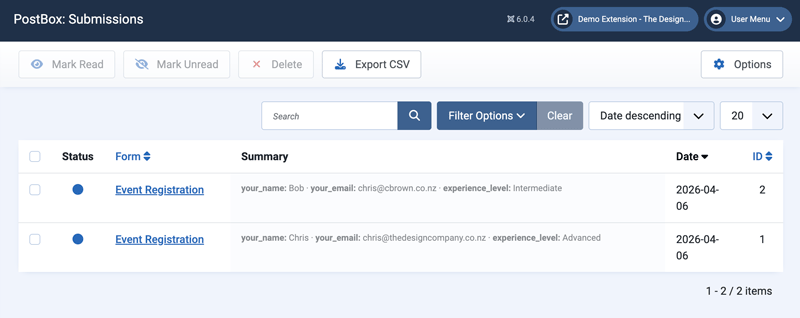
Submissions List
- Filter by form, read/unread status, and date range.
- Search across form data and form titles.
- Unread submissions show a blue dot; read submissions show a grey eye icon.
- Use the toolbar to mark read, mark unread, delete, or export as CSV.
Viewing a Submission
Click a submission to see the full details. The view shows:
- All submitted field data with labels in a table format.
- Email fields are clickable mailto links.
- Metadata: form name, date, read status, IP address, and user agent.
Submissions are automatically marked as read when viewed.
CSV Export
Click Export CSV in the toolbar to download all submissions (or filtered submissions) as a CSV file. The export includes all field data columns across all submissions.
Spam Protection
PostBox uses three layers of spam protection:
Honeypot (Always Active)
A hidden field is included on every form. Bots that auto-fill all fields will trigger it. When triggered, the bot receives a fake success response to prevent retrying.
Rate Limiting (Always Active)
Limits the number of submissions per IP address within a configurable time window. Configure in Components > PostBox > Options > Rate Limiting:
- Max Submissions — maximum allowed per IP per form (default: 5).
- Time Window — cooldown period in minutes (default: 60).
Captcha (Optional)
Supports hCaptcha and Cloudflare Turnstile. To enable:
- Go to Components > PostBox > Options > Captcha Settings.
- Select a provider and enter your Site Key and Secret Key.
- Edit your form and set Enable Captcha to Yes on the Spam & GDPR tab.
The captcha widget appears above the submit button.
GDPR Compliance
Consent Checkbox
Enable per form on the Spam & GDPR tab. When enabled, a checkbox with customisable text is shown and must be ticked before submission. The server validates consent regardless of client-side checks.
Data Retention
Set a retention period (in days) per form. Submissions older than the retention period are automatically deleted by the PostBox Purge scheduled task.
Setting Up Auto-Purge
- Go to System > Scheduled Tasks.
- Create a new task and select PostBox: Purge Expired Submissions.
- Set the schedule (e.g. daily).
- The task will delete expired submissions and clean up old rate limit entries.
Component Options
Access via Components > PostBox > Options (cog icon in the toolbar).
Email Settings
- From Name — sender name for notification emails. Leave blank to use Joomla’s global mail settings.
- From Email — sender email address. Leave blank to use Joomla’s global mail settings.
Captcha Settings
- Captcha Provider — None, hCaptcha, or Cloudflare Turnstile.
- Site Key — from your captcha provider’s dashboard.
- Secret Key — from your captcha provider’s dashboard.
Rate Limiting
- Max Submissions — maximum submissions per IP per form within the time window.
- Time Window (minutes) — the cooldown period.
GDPR / Data Retention
- Default Retention (days) — default retention period for new forms. Can be overridden per form. Set to 0 to keep submissions forever.
Template Overrides
Styling
PostBox ships with clean default styling. To customise, create a template override:
templates/{your-template}/html/com_postbox/form/default.php
All form elements use .postbox-* CSS classes for easy targeting.
CSS Classes Reference
.postbox-form-wrapper— outer container (max-width 640px, centred).postbox-form-header— title and description area.postbox-form-title— form heading.postbox-form-description— form description text.postbox-form— the form element.postbox-field— individual field wrapper.postbox-field--required— required field modifier.postbox-field--error— error state modifier.postbox-field-error— error message container.postbox-option— checkbox/radio option label.postbox-required— asterisk marker.postbox-button— submit button.postbox-message— success/error message area.postbox-message--success— success state.postbox-message--error— error state
Shortcode Embedding
PostBox includes a content plugin that lets you embed forms in articles and custom HTML modules using a simple shortcode.
Setup
- Go to System > Plugins and ensure PostBox — Shortcode is enabled (it is enabled by default on install).
- In any article, add the shortcode where you want the form to appear:
{postbox 1}
Replace 1 with the ID of the form you want to display. You can find the form ID in the Components > PostBox > Forms list.
Usage Tips
- Add contact details, opening hours, or other content above or below the shortcode — the form renders inline within the article.
- You can embed multiple forms on the same page using different IDs.
- The shortcode works in standard articles and in any content that triggers Joomla’s content prepare event.
- All form features work identically to the menu item version — AJAX submission, validation, spam protection, and email notifications.
Support
For help, feature requests, or bug reports, visit the PostBox page on the TDCLab extensions site:
https://extensions.thedesigncompany.co.nz
Licence
PostBox is free software released under the GNU General Public License v2 or later.